Valheim: Add User as Admin
In this guide
As a guide for Valheim server administration, it's important to note that the available admin actions are quite limited. Generally, you can only perform tasks such as kicking and banning players. For more substantial modifications to the gameplay, you'll need to rely on mods.
To learn how to utilize the Thunderstore Mod Manager for modding Valheim, please consult the following resource: https://help.dathost.net/article/97-valheim-how-to-use-thunderstore-mod-manager-for-modding
Add User as Admin - Steam
- 1
- Go to your Control Panel at DatHost and click Edit on your Valheim Server.
- 2
- Go to the Settings page found in the left menu
- 3
-
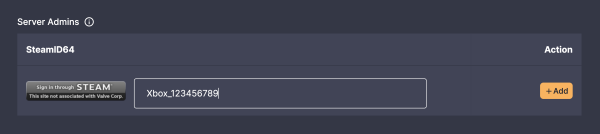
To add yourself as an admin, click the button "Sign in through Steam".
Once you have signed in, your SteamID64 will be in the text field. Click the orange button "Add" to finally add your ID (steamuser) to the admin list. Example below:
Your SteamID64 can also be found by using steamid.io in case you don't want to login using Steam. - 4
- Save the file and Reboot your server. Done!
Add User as Admin - Xbox
- 1
- Go to your Control Panel at DatHost and click Edit on your Valheim Server.
- 2
-
Go to the Console found in the left menu
Make sure that you have connected to your server recently with the Xbox account you want to make admin. You will need the server logs of your connection. - 3
-
Once you are in the Console, do CTRL + F to search for the following "Platform ID".
You will see both your XBOX User ID and your character name a few lines down the road. Copy the Xbox ID. Visible example below:
- 4
- Then, go to the Settings page found in the left menu.